Real Time Clock PCF8523 su CM3 Panel
Testato su Raspbian GNU/Linux 9.4 (stretch) Kernel 4.14.34-v7+
Installazione dei pacchetti necessari:
$ sudo apt-get install python-smbus i2c-tools
Modificare il file config.txt :
$ sudo nano /boot/config.txt
Aggiungere alla fine del file:
# RTC PCF8523 GPIO 28 - GPIO 29 (i2c1 utilizzato dal touch screen)
dtoverlay=i2c0-bcm2708,sda0_pin=28,scl0_pin=29,pin_func=6
dtoverlay=i2c0-rtc,pcf8523
Lanciare in sequenza i seguenti comandi
$ sudo apt-get -y remove fake-hwclock
$ sudo update-rc.d -f fake-hwclock remove
$ sudo systemctl disable fake-hwclock
Editare il file /lib/udev/hwclock-set e commentare le linee seguenti:
$ sudo nano /lib/udev/hwclock-set
#if [ -e /run/systemd/system ] ; then
# exit 0
#fi
Modificare il file /etc/modules:
$ sudo nano /etc/modules
# /etc/modules: kernel modules to load at boot time.
# This file contains the names of kernel modules that should be loaded
# at boot time, one per line. Lines beginning with "#" are ignored.

snd-bcm2835
spi-bcm2708
i2c-bcm2708
i2c-dev
rtc-8523
Modificare il file /etc/rc.local ed inserire prima della riga dove scritto exit 0 le seguenti istruzioni:
$ sudo nano /etc/rc.local
# PCF8523
echo pcf8523 0x68 > /sys/class/i2c-adapter/i2c-0/new_device

exit 0
Effettuare il reboot della scheda.
$ sudo reboot
Dopo il reboot lanciare il comando :
sudo i2cdetect -y 0
Sotto il risultato da ottenere, significa che l'indirizzo corrispondente è 0x68, esattamente quello che abbiamo inserito in precedenza nel file /etc/rc.local
     0  1  2  3  4  5  6  7  8  9  a  b  c  d  e  f
00:          -- -- -- -- -- -- -- -- -- -- -- -- --
10: -- -- -- -- -- -- -- -- -- -- -- -- -- -- -- --
20: -- -- -- -- -- -- -- -- -- -- -- -- -- -- -- --
30: -- -- -- -- -- -- -- -- -- -- -- -- -- -- -- --
40: -- -- -- -- -- -- -- -- -- -- -- -- -- -- -- --
50: -- -- -- -- -- -- -- -- -- -- -- -- -- -- -- --
60: -- -- -- -- -- -- -- -- UU -- -- -- -- -- -- --
70: -- -- -- -- -- -- -- --
Il comando seguente permette di vedere l'indirizzo utilizzato dal touch screen (i2c-1), ecco il motivo delle modifiche eseguite rispetto alla procedura trovata sul sito.
sudo i2cdetect -y 1
Ora lanciare il comando seguente:
sudo hwclock -D -r
Verifica con comando dmesg, devono risultare le righe indicate di seguito.
dmesg

[   12.149577] i2c i2c-0: new_device: Instantiated device pcf8523 at 0x68
[   12.177994] rtc-pcf8523 0-0068: rtc core: registered rtc-pcf8523 as rtc0
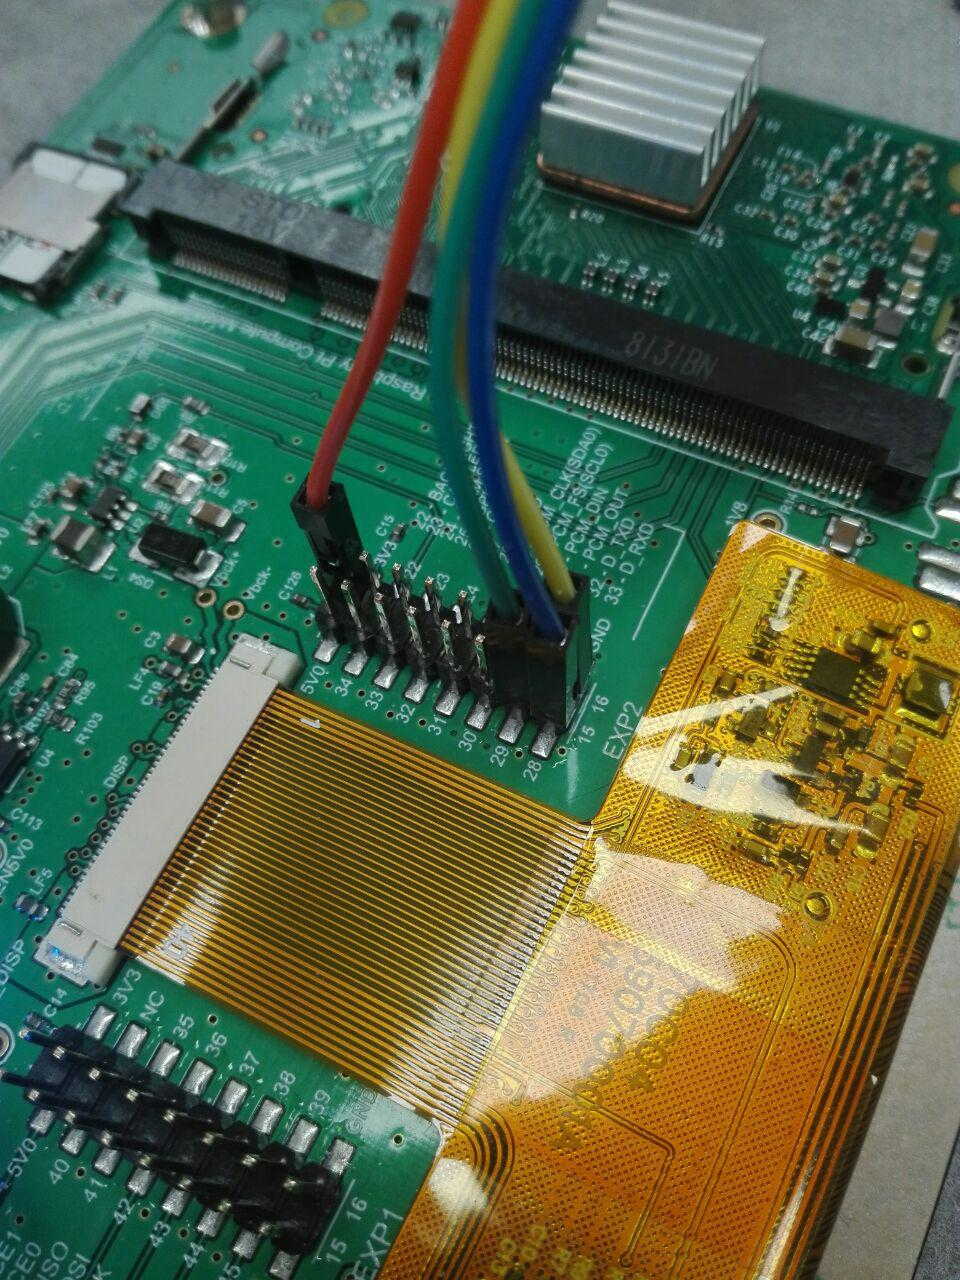
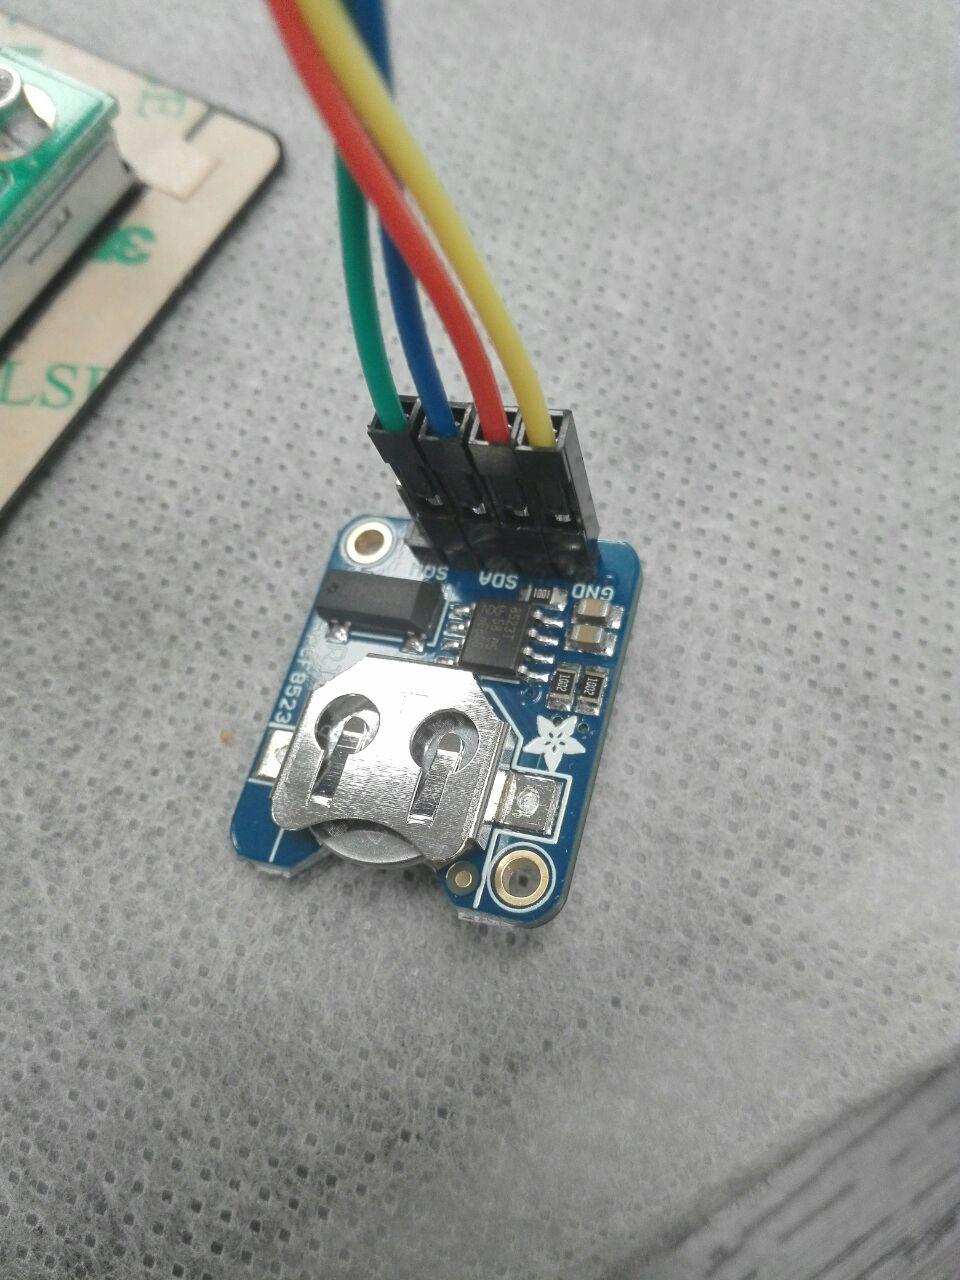
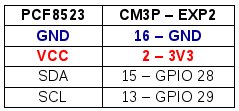
Questa la parte dei collegamenti tra il modulo RTC e la scheda Acme CM3 Panel:
Connettore espansione EXP2

Connettore PCF8523

Tabella riepilogativa collegamenti tra i pin del modulo RTC e quelli del connettore EXP2 della CM3 Panel.

Ora faccio un test sullo scarto di precisione del modulo RTC, ho una CM3 Panel-U collegata alla rete internet ed un altra CM3 Panel-W alla quale è collegato il modulo RTC. La CM3 Panel-W è stata spenta dalle ore 18:00 del giorno precedente e riaccesa il giorno successivo alle ore 08:00 senza connessione alla rete internet. Verificando attraverso il sito: http://www.oraesattaitalia.it/ c'è uno scarto di +2 secondi, viene effettuato lo stesso test sulla CM3 Panel-U, in questo caso lo scarto è di +1 secondo.
Sulla CM3 Panel-U lancio il seguente comando:
$ sudo ntpdate ntp1.inrim.it
16 May 08:14:44 ntpdate[1575]: adjust time server 193.204.114.232 offset -0.000823 sec
# Cronjob
@reboot  sudo ntpdate ntp1.inrim.it
Lanciando il comando sulla scheda con RTC ottengo:
$ sudo hwclock -D -r

hwclock from util-linux 2.29.2
Using the /dev interface to the clock.
Assuming hardware clock is kept in UTC time.
Waiting for clock tick...
/dev/rtc does not have interrupt functions. Waiting in loop for time from /dev/rtc to change
...got clock tick
Time read from Hardware Clock: 2019/05/16 06:38:53
Hw clock time : 2019/05/16 06:38:53 = 1557988733 seconds since 1969
Time since last adjustment is 1557988733 seconds
Calculated Hardware Clock drift is 0.000000 seconds
2019-05-16 08:38:52.386158+0200
$ sudo ntpdate ntp1.inrim.it
$ sudo hwclock -w # Set the hardware clock from the current system time
$ sudo hwclock -r   # Read hardware clock and print result
$ date              # Read system clock and print result
Esito test di verifica sulla scheda con modulo RTC
La scheda è stata spenta alle ore 10:00 il giorno precedente e riaccesa alle ore 11:30 del giorno successivo. La stessa una a volta avviata non ha effettuato volutamente nessuna sincronizzazione tramite server NTP server italiano. Una volta lanciato il comando seguente di sincronizzazione con lo stesso server NTP, il risultato è il seguente (offset 0.000914 sec).
$ sudo ntpdate ntp1.inrim.it

# Risultato
17 May 11:39:35 ntpdate[1301]: adjust time server 193.204.114.232 offset 0.000914 sec
Datasheet
Links
- CM3-PANEL - Panel PC based on Raspberry Compute Module 3 lite https://www.acmesystems.it/CM3-PANEL
- Set Up & Test I2C | Adding a Real Time Clock to Raspberry Pi | Adafruit Learning System https://learn.adafruit.com/adding-a-real-time-clock-to-raspberry-pi/set-up-and-test-i2c

CMMS (Computerized Maintenance Management System) & CAFM (Computer Aided Facility Management) Specialist Project Manager
Analyst & Developer - Building Automation & Access Control Systems Integrator
Linux Server Administrator - KVM Kernel-based Virtual Machine - Red Hat Enterprise - Fedora - Centos
http://www.coolprojects.it - http://www.multiconproject.com - http://www.multiconproject.it - https://github.com/maurotocci