Come realizzare dei grafici su OpenHAB
Installare InfluxDB e Grafana seguendo questi tutorial
Per Grafana e Influxdb possiamo usare l'installazione standard da openhabian-config come spiegato nel getting started oppure proseguire con l'installazione manuale come spiegato di seguito, considerando solo quanto evidenziato con "(anche con installazione standard)"
Installare il binding
persistence-influxdb - 1.10.0
Installare APT extension
sudo apt-get update && sudo apt-get install apt-transport-https
InfluxDB
wget -O - https://repos.influxdata.com/influxdb.key | sudo apt-key add -
echo "deb https://repos.influxdata.com/debian jessie stable" | sudo tee /etc/apt/sources.list.d/influxdb.list
sudo apt-get update && sudo apt-get install influxdb
Far partire in automatico InfluxDB
sudo systemctl daemon-reload
sudo systemctl enable influxdb.service
sudo systemctl start influxdb.service
Creare la tabella e settare i permessi su InfluDB (anche con installazione standard): influx -username admin -password admin Connected to http://localhost:8086 version 1.7.8 InfluxDB shell version: 1.7.8
CREATE DATABASE openhab_db
CREATE USER admin WITH PASSWORD 'admin' WITH ALL PRIVILEGES
CREATE USER openhab WITH PASSWORD 'openhab'
CREATE USER grafana WITH PASSWORD 'grafana'
GRANT ALL ON openhab_db TO openhab
GRANT READ ON openhab_db TO grafana
exit
Abilitare l'autenticazione nella sezione HTTP (anche con installazione standard)
sudo vim /etc/influxdb/influxdb.conf

[http]
# Determines whether HTTP endpoint is enabled.
enabled = true

# The bind address used by the HTTP service.
bind-address = ":8086"

# Determines whether user authentication is enabled over HTTP/HTTPS.""
auth-enabled = true
Restart del servizio InfluxDB
sudo systemctl restart influxdb.service
GRAFANA
Grafana non supporta ufficialmente architetture ARM, però possiamo usufruire dei seguenti forniti da un utente:
echo "deb https://dl.bintray.com/fg2it/deb jessie main" | sudo tee /etc/apt/sources.list.d/grafana-fg2it.list
sudo apt-key adv --keyserver keyserver.ubuntu.com --recv-keys 379CE192D401AB61
sudo apt-get update && sudo apt-get install grafana
Abilitiamo Grafana a partire allo startup del sistema:
sudo systemctl daemon-reload
sudo systemctl enable grafana-server.service
sudo systemctl start grafana-server.service
Grafana dovrebbe ora essere visibile alla pagina http://IP_CM3HOME:3000 con default login admin:admin
Disattiviamo la registrazione e abilitiamo gli utenti anonimi ad accedere a Grafana (anche con installazione standard)
sudo vim /etc/grafana/grafana.ini
[users]
# disable user signup / registration
allow_sign_up = false
...
[auth.anonymous]
# enable anonymous access
enabled = true
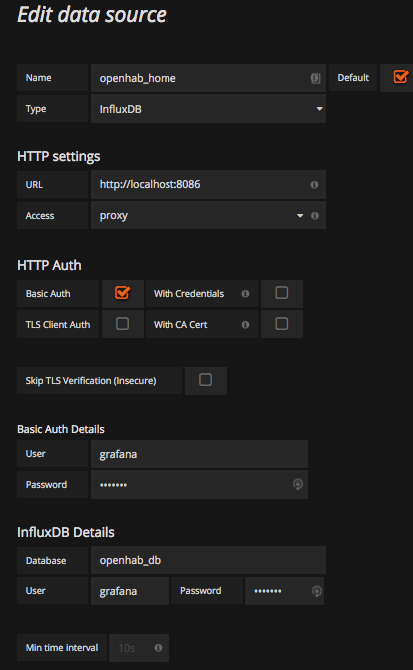
Connettiamo ora Grafana a InfuxDB (anche con installazione standard)

Connettere OpenHab a InfluxDB (anche con installazione standard)
Dopo essere sicuri di avere installato il binding persistence-influxdb - 1.10.0
sudo vim /etc/openhab2/services/influxdb.cfg
Inserire le seguenti righe:
# The database URL, e.g. http://127.0.0.1:8086 or https://127.0.0.1:8084 .
# Defaults to: http://127.0.0.1:8086
url=http://127.0.0.1:8086

# The name of the database user, e.g. openhab.
# Defaults to: openhab
user=openhab

# The password of the database user.
password=openhab

# The name of the database, e.g. openhab.
# Defaults to: openhab
db=openhab_db

# The retention policy to be used, needs to configured in InfluxDB
# Till v0.13: 'default', since v1.0: 'autogen'
retentionPolicy=autogen
Ora inserire la strategia di aggiornamento dei dati
vim /etc/openhab2/persistence/influxdb.persist
Strategies {
everyMinute  : "0 * * * * ?"
everyHour    : "0 0 * * * ?"
everyDay     : "0 0 0 * * ?"
}

/* Formato group*, item, * all items*/
Items {
gTemperatura*, avgTemperatura*, Temp*, avgLuminosita*, sumPotenza*, sumEnergia*, gPotenza*, gEnergia*, gUmidita* : strategy =  everyMinute, everyChange, restoreOnStartup
}
Verificare che l'accesso a samba sia consentito usando le credenziali openhabian/openhabian
Link utili

Sono cresciuto nel modo IT di aziende ad alto contenuto tecnologico e da sempre ho acquisto esperienze nel settore della domotica e sicurezza residenziale. Negli ultimi dieci anni ho acquisito competenze specifiche nel campo delle TLC in particolare sulla rete GSM e sui protocolli ad essa collegati.