OpenHab Modbus
Configuration
Once the Modbus binding is installed, the usual three files are available .
Service
The default configuration of the SDM120 has not been modified. The details about the configuration and the registers exposed by the device are linked below. The system device used in this example is /dev/ttyUSB0, related to the most left RS485 socket on the board.
/etc/openhab2/services/modbus.cfg
#the serial object has been attached to the RS485 port through the /dev/ttyUSB0 device
#the SDM120 default speed is 2400bps
#the handshake is in RTU mode
serial.Voltage.connection=/dev/ttyUSB0:2400:8:none:1:rtu:35:1500:none:none

#this is an input device
serial.Voltage.type=input

#device ID = 1
serial.Voltage.id=1

#the starting register for the Voltage variable is 0 (device dependant)
serial.Voltage.start=0

#the variable is two 16bit world lenght (4 byte)
serial.Voltage.length=2

#it's a float32 variable
serial.Voltage.valuetype=float32

#for each other variable it needs a similar configuration set

serial.Current.connection=/dev/ttyUSB0:2400:8:none:1:rtu:35:1500:none:none
serial.Current.type=input
serial.Current.id=1
serial.Current.start=6
serial.Current.length=2
serial.Current.valuetype=float32

serial.Power.connection=/dev/ttyUSB0:2400:8:none:1:rtu:35:1500:none:none
serial.Power.type=input
serial.Power.id=1
serial.Power.start=12
serial.Power.length=2
serial.Power.valuetype=float32

serial.CosFi.connection=/dev/ttyUSB0:2400:8:none:1:rtu:35:1500:none:none
serial.CosFi.type=input
serial.CosFi.id=1
serial.CosFi.start=30
serial.CosFi.length=2
serial.CosFi.valuetype=float32

serial.Freq.connection=/dev/ttyUSB0:2400:8:none:1:rtu:35:1500:none:none
serial.Freq.type=input
serial.Freq.id=1
serial.Freq.start=70
serial.Freq.length=2
serial.Freq.valuetype=float32

serial.Ener.connection=/dev/ttyUSB0:2400:8:none:1:rtu:35:1500:none:none
serial.Ener.type=input
serial.Ener.id=1
serial.Ener.start=72
serial.Ener.length=2
serial.Ener.valuetype=float32
On this example we read the parameters for voltage, current, active power, power factor (CosFi), frequency and energy for the phase 1 from registers 0, 6, 12, 30, 70 e 72 .
Item
Now we can associate the items to these parameters, the key is the name of the objects created in modbus.cfg. The items related to the desired variables must be formatted for the printout similarly to the printf sintax.
/etc/openhab2/items/modbus.items
Number L1V "Tensione [%.1f V]" {modbus="Voltage:0"}
Number L1A "Corrente [%.1f A]" {modbus="Current:0"}
Number L1P "Potenza A [%.1f W]" {modbus="Power:0"}
Number L1C "Cos Fi [%.2f]" {modbus="CosFi:0"}
Number L1F "Frequenza [%.1f Hz]" {modbus="Freq:0"}
Number L1E "Energia A [%.1f kWh]" {modbus="Ener:0"}
Sitemap
To show the values on the GUI, the variables must be associated to the sitemap. The association is possible through the name of the items.
/etc/openhab2/sitemaps/your-site-name.sitemap
sitemap knx label="GUIOTT home"
{
      ...

        Frame label="Energia"
        {
            Text label="Energia" icon=pressure
            {
                Text item=L1V valuecolor=[>240="red",>230="orange",>220="green",<=220="orange"]
                Text item=L1A
                Text item=L1P valuecolor=[>3300="red",>3000="orange",>2500="green",<=2500="blue"]
                Text item=L1C valuecolor=[>0.8="green",<=0.8="orange"]
                Text item=L1F valuecolor=[<49="orange",>49="green",>51="orange"]
                Text item=L1E
            }
        }

}
Now the service starts polling the energy meter to collect data with the polling time configured on services.cfg file, updating the values on the page:
Classic UI
Basic UI
Or in the Habpanel
using knob widget as instruments, disabling interaction:
you can also enable the measure range of the instrument, so the bar change its color depending on some alarm thresholds:
The values collected can be used to obtain, for example, some audible or visible alarms as in the example below:
/etc/openhab2/rules/modbus.rules
var Cmd="python /etc/openhab2/scripts/led.py "
var Timer set_timer = null

rule "Led"
    when
        Time cron " 0/3 * * ? * * *"
    then
        var Power = (L1P.state as DecimalType).intValue
         if (Power <= 2500)
         {
             //val results = executeCommandLine(Cmd+"G",5000)
             //logInfo("Exec",results)
             sendCommand(LedG, OFF)
             sendCommand(LedB, ON)
             sendCommand(LedR, ON)
             set_timer = createTimer(now.plusSeconds(0.1))
             [
                sendCommand(LedG, ON)
                set_timer = null
             ]
         }
         else if (Power > 2500 && Power <= 3000)
         {
            //val results = executeCommandLine(Cmd+"B",5000)
            //logInfo("Exec",results)
            sendCommand(LedB, OFF)
            sendCommand(LedG, ON)
            sendCommand(LedR, ON)
            set_timer = createTimer(now.plusSeconds(0.1))
            [
               sendCommand(LedB, ON)
               set_timer = null
            ]
        }
         else if (Power > 3000)
         {
            //val results = executeCommandLine(Cmd+"R",5000)
            //logInfo("Exec",results)
            sendCommand(LedR, OFF)
            sendCommand(LedB, ON)
            sendCommand(LedG, ON)
            sendCommand(Rele1, ON)
            set_timer = createTimer(now.plusSeconds(0.1))
            [
               sendCommand(LedR, ON)
               set_timer = null
            ]
            set_timer = createTimer(now.plusSeconds(1))
            [
               sendCommand(Rele1, OFF)
               set_timer = null
            ]
        }
end
In this case the CM3-Home RGB LED blinks with different colors when some electrical power thresholds have been exceeded. Furthermore one of the two relays is used to switch a buzzer, alerting with more evidence that the contractual power threshold has been exceeded. More details here. This is one of the most useful function I use often, hearing the beep I immediately switch off the appliance I'm using, avoiding to go dowstairs to reset the main breaker.
In the picture below the buzzer connected:
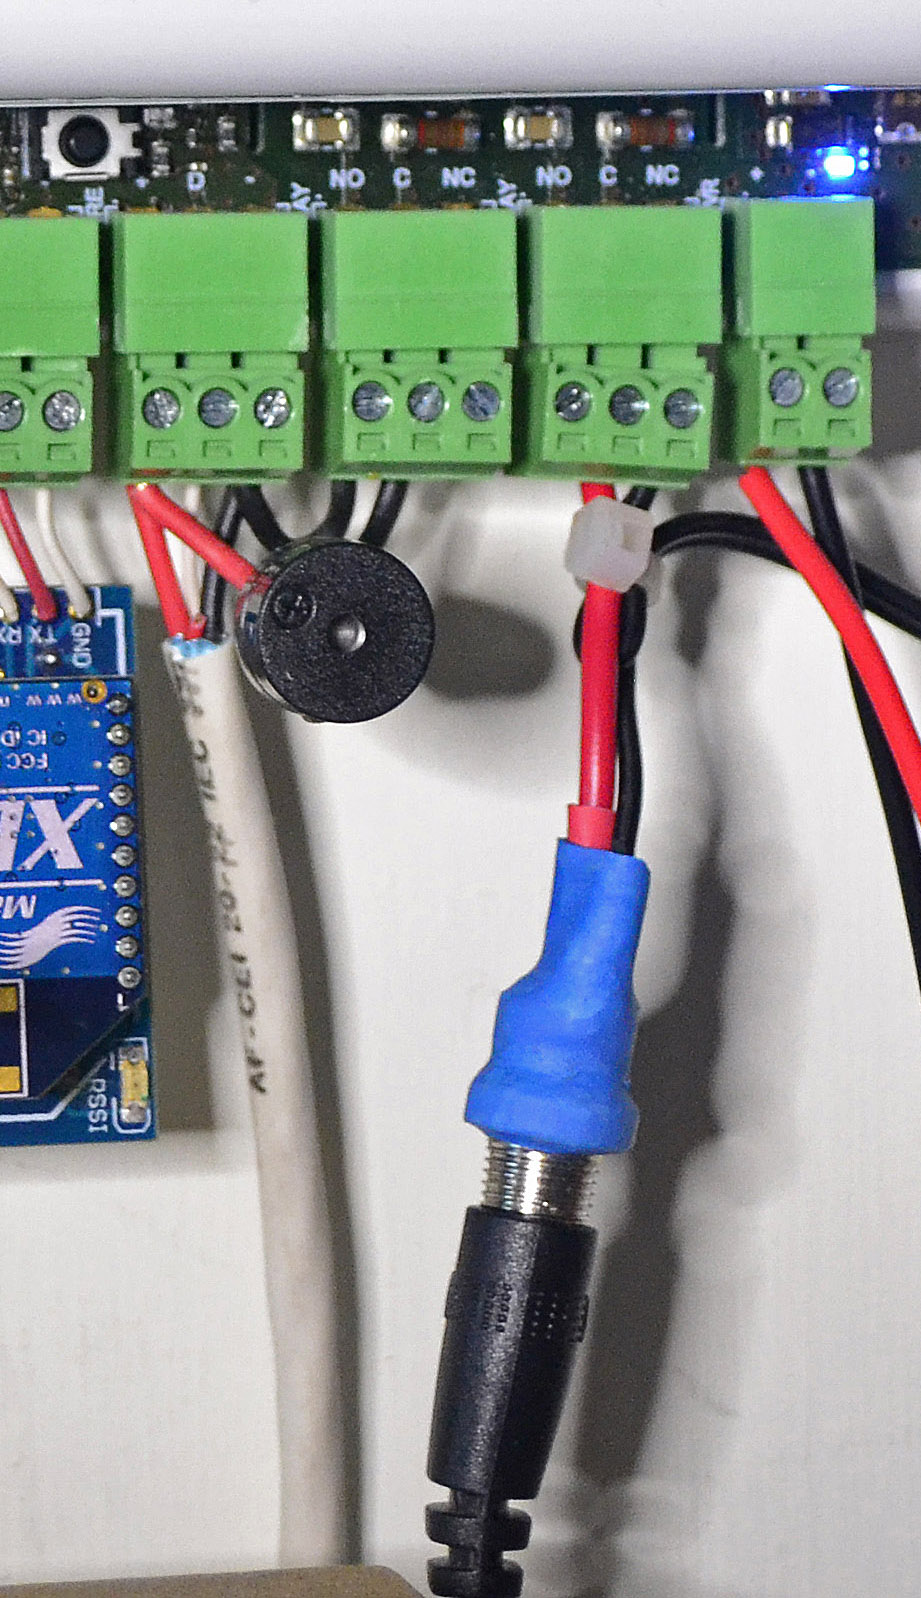
The 3.3V power supply come from the 1-wire connector on the left and is switched by the normally open contact of the relay.
Links
- Modbus binding
- Eastron SDM120
- Flavio Anesi, esempi di utilizzo
- Brochure SDM120
- HTTP interface to SDM120
- Simply Modbus, librerie Modbus
- Configuration example
- SDM120 data, exposed registers and protocol

He deals with electronic design and embedded system firmware for Robotics and industrial and civil applications, as well as technical disclosure on the internet.
http://www.guiott.com - https://github.com/guiott - guido@guiott.com

Sono cresciuto nel modo IT di aziende ad alto contenuto tecnologico e da sempre ho acquisto esperienze nel settore della domotica e sicurezza residenziale. Negli ultimi dieci anni ho acquisito competenze specifiche nel campo delle TLC in particolare sulla rete GSM e sui protocolli ad essa collegati.

Docente di elettrotecnica e sistemi automatici di istituto tecnico e tecnologico scuola superiore di secondo grado
linkedin -