OpenHAB and OneWire
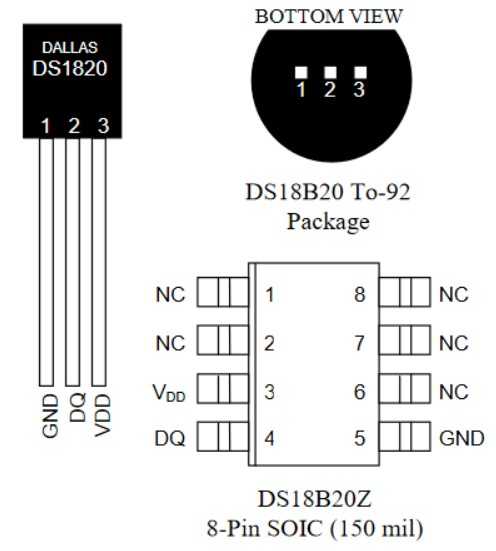
The DS18B20 sensor has this pinout:

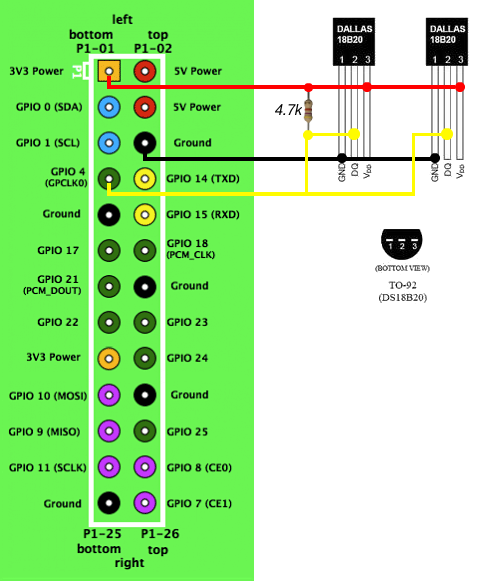
It needs a 3.3V power supply and a 4.7 or 10KΩ resistor on the data line:

On the Raspberry PI3 connect the data line to PIN 7 (BCM 4) and add the lines below to /boot/config.txt file:
# Enable 1Wire on GPIO
dtoverlay=w1-gpio,gpiopin=4
On the CM3-Home connect the sensor as shown below:

As depicted on the schematic diagram, the 1-wire data line is interfaced through a dedicated buffer in order to allow a more robust bus, therefore it doesn't require a pullup.
add:
# Enable the 1-wire bus
dtoverlay=w1-gpio,gpiopin=16
Reboot the board.
The sensors wired are automatically detected by the Linux Kernel and a new directory is created on the folder /sys/bus/w1/devices for each of them.
$ ls /sys/bus/w1/devices/
28-000006c423d3
In this case a temperature sensor with id=28-000006c423d3 has been detected. To read the temperature value type:
$ watch cat /sys/bus/w1/devices/28-000006c423d3/w1_slave
a4 01 4b 46 7f ff 0c 10 da : crc=da YES
a4 01 4b 46 7f ff 0c 10 da t=26250
OpenHab
To read the sensor value we are going to use the binding that allows to execute periodically a script:
Install the Exec Binding
Scripts
Create the file
/etc/openhab2/scripts/onewiretemp.sh
add the following lines:
#!/bin/bash
wert=`cat /sys/bus/w1/devices/$1/w1_slave | tail -n1 | cut -d '=' -f2`
wert2=`echo "scale=3; $wert/1000" | bc`
echo $wert2
test the script executing the command ./onewiretemp.sh sensorID
Things
Create the file
/etc/openhab2/things/onewire.things
add the following line:
exec:command:onewiretemp1 [command="bash /etc/openhab2/scripts/onewiretemp.sh IDSensore", interval=60, timeout=5, autorun=false]
Items
Create the file
/etc/openhab2/items/onewire.items
add the following line:
String onewiretemp1Value "La temperatura del sensore 1 è [%s °C]" <temperature> {channel="exec:command:onewiretemp1:output"}
Add the sensor to sitemap to show the value on UI:
Text item=onewiretemp1Value
Or use the item value in a widget to show it in an habpanel, as in this example
Links
- GPIO 1-Wire Temp sensors on Raspberry Pi with openHABian
- Raspberry PIN setup
- Il sensore di temperatura Dallas DS18B20

Sono cresciuto nel modo IT di aziende ad alto contenuto tecnologico e da sempre ho acquisto esperienze nel settore della domotica e sicurezza residenziale. Negli ultimi dieci anni ho acquisito competenze specifiche nel campo delle TLC in particolare sulla rete GSM e sui protocolli ad essa collegati.

Fondatore di Area SX srl, Acme Systems srl e del TanzoLab, si occupa dal 1974 di elettronica digitale, dal 1978 di microprocessori, dal 1992 di microcontroller, dal 1995 di Linux e pubblicazioni su Web, dal 2005 di progettazione, produzione e commercializzazione di schede Linux Embedded.
http://www.tanzilli.com - http://www.acmesystems.it - https://github.com/tanzilli - sergio@tanzilli.com